

How To Export Adobe Premiere For Youtube
You've but created and edited your YouTube video and now want to export it. But, what are the best export settings for Premiere Pro? We likewise look at the best settings in Premiere Pro CC for YouTube?
When exporting your video, the all-time consign settings are crucial to the platform you are looking to present your content on.
They vary depending on the platform, so you lot want to make sure your export settings in Premiere Pro CC are at the optimum level to provide your audience with quality video and audio.
How to set the best export settings for Premiere Pro
Hither'southward how to set the all-time export settings for Premiere Pro. Our piece of cake to apply guide will show you how to set up the best export settings for your video project.
Let'south cheque out, how to prepare the best export settings for Premiere Pro beneath:
1. Firstly ready in and out points

Once yous take finished editing your video you will want to fix the in and out points to your video. Firstly move the playhead to where you want the rendering to begin on your video and press "I" on the keyboard. Then motion over to where you wish the rendering of the video to end and click "O" on your keyboard.
The grey department volition show you where your video begins and ends when exporting (See epitome to a higher place).
Great! Once this is washed, we are ready to export your video.
Adjacent select File > Consign > Media file in the bill of fare – you lot will then see this menu pop upwards:
The to a higher place consign menu will pop upwardly with an image of your video to the left. Hither you can select a preset export setting and format. Or you can set your ain custom consign settings. This will allow y'all to pick and choose for your preferred platform.
You lot may also be interested in How to export a video from Premiere Pro.
All-time export settings in Premiere Pro for YouTube
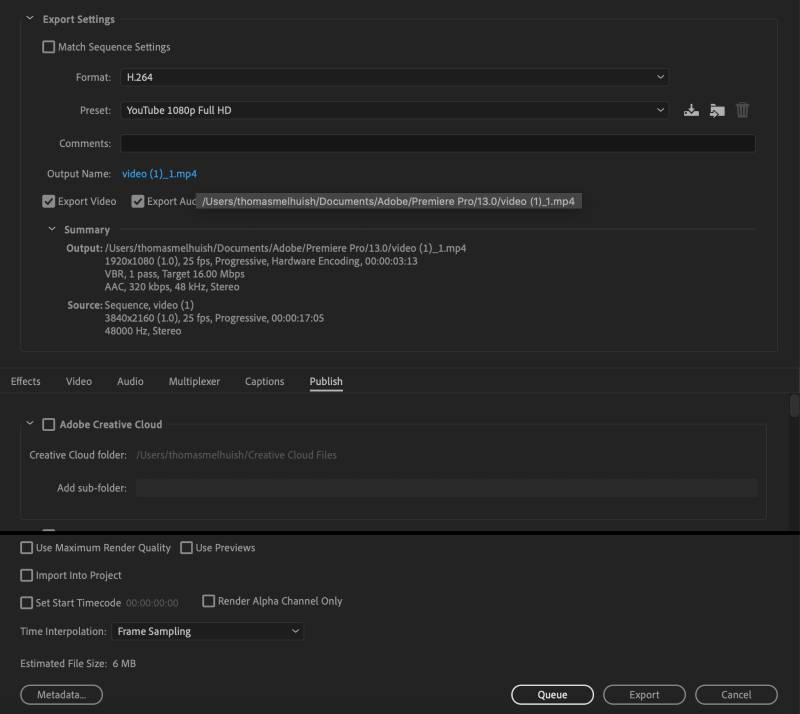
The beginning step is to select the format settings option. The all-time format to export from premiere pro is to select H.264 – as the format.

And then, straight beneath, choose your preset – we recommend using the YouTube 1080p Full HD preset – only don't worry – this can be customised to suit; y'all don't want to leave it on the exact preset. Remember to make sure that directly below the format and preset, both the audio and video checkboxes are both ticked.

Set the bones video settings and bitrate settings for YouTube
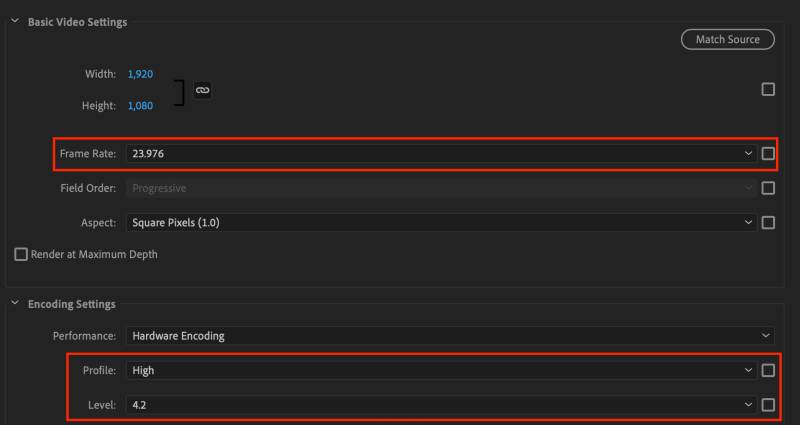
You lot will then desire to click on the Basic Video Settings tab. Here nosotros recommend setting the Frame rate to 23.976 and brand sure the "Width" is 1,920 and the Height is 1,080.
Set the bitrate settings
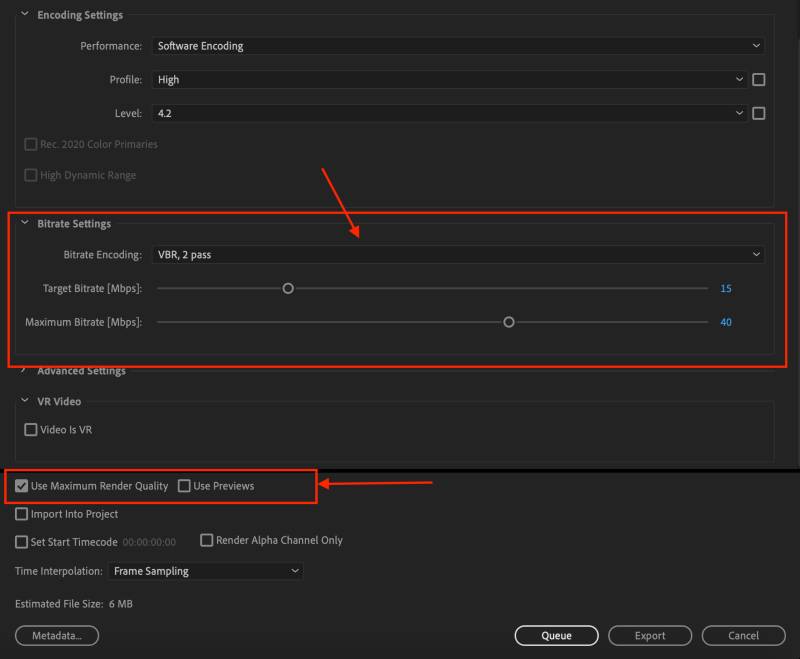
For optimum bitrate settings, whorl nether the Bitrate heading and set the Bitrate encoding to VBR, 2 Pass, and so set the Target Bitrate to 15 and Maximum Bitrate to 40. Don't forget to bank check the box saying "Apply Maximum Render Quality."
Set the audio Export Settings
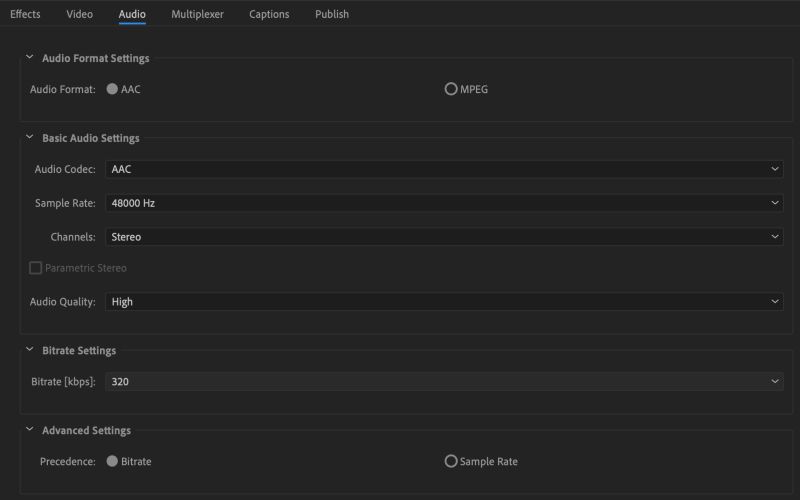
For the audio export settings, click the Export Settings tab and set to the following specs:
- Audio Format – AAC
- Bones Sound Settings set Audio Codec to AAC
- Sample Rate to 48000 Hz
- Channels – Stereo
- Sound Quality – High
- Bitrate Settings:
- Bitrate – 320
- Click Avant-garde Settings and set Precedence to Bitrate.
Your video is ready to export! Finally, click Consign, and Premiere Pro will render your video and audio ready to upload to Youtube!
If you want to set your own you tin can follow these simple steps: custom consign presets.
If this was a useful article on the best export settings in Premiere Pro, cheque out our in-depth guide on the best sequence settings premiere pro, the all-time gratis premiere pro transitions and finally, how to crop video in Premiere Pro.
Why not read: What does Disney own? Discover out now.
We hope this article on the all-time export settings in Premiere Pro CC is helpful to you. Please feel free to sign up for our newsletter and blogs for more Adobe Premiere Pro tips and tutorials.
Let us know in the comments what you thought of our commodity on the best consign settings in Premiere Pro CC down below.
Check out some of our latest articles below:
- Lumetri scopes functionality: A beginners guide
- How To Resize Videos In Premiere Pro
- How to add together handheld camera shake in Adobe Premiere Pro
- A beginners guide to Adobe Premiere Pro: Acquire Premiere Pro in fifteen minutes
- How to become that cinematic feel in Adobe Premiere Pro
- The Acme v Adobe Premiere Pro Tutorials
How to clear cache in Premiere Pro
When you edit with Premiere Pro, you lot want to ensure it's running at its optimum operation, and 1 of the factors that allow Premiere Pro to run smoothly is to clear the cache. To assist maintain optimal performance, clearing old media cache files can assist ensure you run Premiere Pro smoothly. Knowing how to clear […]
Why does Premiere Pro say media offline?
Occasionally yous'll get the offline screen of death and wonder why does Premiere Pro say media offline? Well, there is a reason for this. Basically anytime you rename, move or delete a video file that is referenced within your Premiere Pro video. This is when you will have the "Media offline" fault. Let's go back […]
How to add together blackness bars in Premiere Pro
When you're watching a blockbuster in the cinema, you meet those black bars that scream cinematic curiosity. Information technology adds another layer to your film. That, paired with the perfect color grading, adds that side by side level of authenticity to your creation. New creators oft ask us, "how tin I add black bars in Premiere Pro?". Letterboxing […]
How to soften a keyframe in Premiere Pro
Most people will usually apply Afterwards Effects to smooth and soften a keyframe. Merely that doesn't take to be the example. Today's tutorial shows you how to soften a keyframe in Premiere Pro. One of the best tools to soften a keyframe in Premiere Pro is to apply the graph editor. We delve into how […]
Suit saturation in Premiere Pro
When y'all import your footage into Premiere Pro, you will want to colour right information technology and emphasise certain moods and tones. Here nosotros show you how to arrange saturation in Premiere Pro. Saturation is imperative in mail-production to increase or decrease the intensity of the color in the video. This article looks at what saturation […]
How to green screen in Premiere Pro!
Ever wondered how they become the furnishings behind the weather reporter? Accept you e'er wondered how they get those epic effects in one of your favourite activeness movies? Well, it's courtesy of the green screen! Hither nosotros show you how to green screen in Premiere Pro. The green screen is an essential part of the […]
Source: https://ifilmthings.com/the-best-export-settings-for-premiere-pro/
Posted by: freemanslingly1956.blogspot.com
0 Response to "How To Export Adobe Premiere For Youtube"
Post a Comment